How a Garden Soil Test Helps Plants Thrive
Do you want to give your vegetable plants a boost and help them thrive? If you do, the place to start is with a garden soil test.
The health of any garden is directly linked to the condition of its soil. Just as we go to the doctor for an annual check-up, soil testing gives you an insight into what’s happening beneath the surface.
Tests reveal vital information such as nutrient levels, pH balance, and the presence of any harmful elements that could impede plant growth. By understanding these factors, you can make informed decisions about how to care for your garden.
Understanding Your Garden’s Soil
Four Components of Soil
Soil is a complex and dynamic medium and consists of four components: air, minerals, water, and the decaying remains of plants and animals.
About half of the soil volume consists of minerals and organic matter. Minerals make up about 45% of this volume. They vary in kind and size from microscopic to visible to the naked eye. The remaining 5% or so of this half of the soil volume is made up of organic matter. It contains plant and animal remains in varying stages of decomposition.
The other half of soil volume is a combination of air and water. They take up ‘pore space’ between the minerals and organic matter. Since air and water can’t occupy the same space at the same time, each increases and decreases based on the other.
When soil is saturated with water, the air is pushed out. Conversely, when the soil is dry, the water is replaced by air. Ideal conditions for plants are when the pore spaces contain 25% air and 25% water.
Physical Properties and Chemical Composition of Soil
A soil’s physical properties and its chemical composition are mostly what determines the suitability for growing plants.
The physical characteristics are what you can see and feel. These include color, texture, structure, drainage, depth, and organic matter.
Of these, the color tends to indicate the organic makeup of the soil. Texture and structure determine the amount of drainage in the soil. Depth is the vertical distance from the surface to a layer where roots are stopped from growing downward. Decomposing that happens in the organic layer converts nutrients into minerals. It then makes them available for use as the inorganic form of nutrients for growing plants.
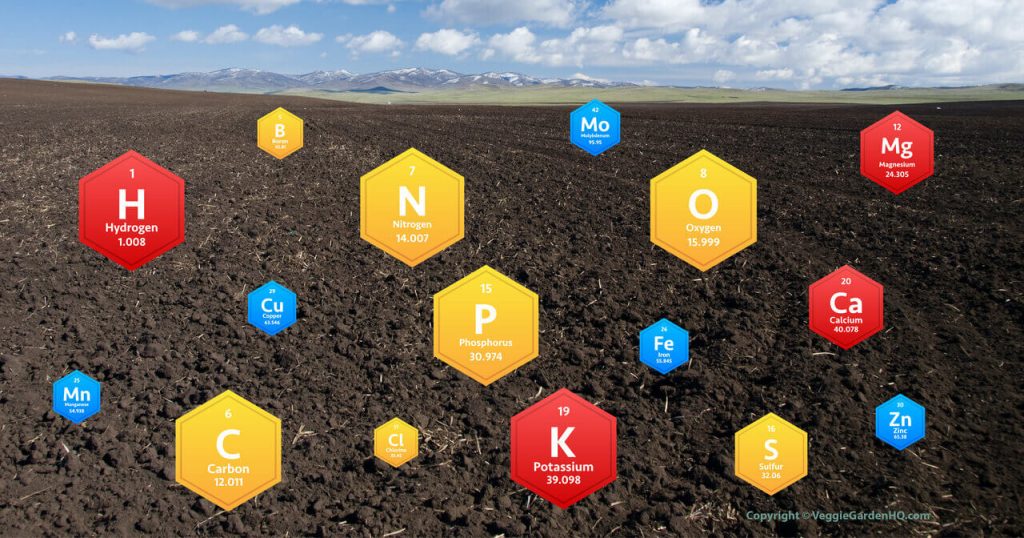
The chemical composition of the soil is made up of macronutrients and micronutrients which are essential for plant growth. These include carbon, hydrogen, oxygen, nitrogen, phosphorus, potassium, calcium, magnesium, and sulfur. To a lesser extent, boron, chlorine, iron, manganese, copper, molybdenum, and zinc are also included.
If a plant lacks any of these elements, it will show signs of nutrient deficiency.
The measurement of hydrogen ion activity in soil is called pH. It measures the degree of acidity or alkalinity. Soil pH greatly affects the solubility of almost all nutrients. Plants differ as to what pH soil they grow best in, so knowing the soil pH is important.
Choosing Sampling Locations
As gardeners, we tend to focus on what’s above the ground – green leaves, colorful flowers, and fruitful harvests. However, the secret to a successful garden lies within the soil.
When it comes to a garden soil test, an analysis is only as good as the methods used to collect the sample. Make sure that the sample accurately represents the entire area to be treated.
For a small garden, a few well-chosen spots might suffice. However, in a larger or more varied landscape, this means sampling from different sections.
Have separate samples tested for areas where different types of plants will grow. The idea is to cover the diversity of your garden’s terrain. At the same time collect separate samples from areas for turf, landscape plants, fruit trees, and vegetables.
The concept of random sampling is also important. Avoid only sampling from areas that look either particularly lush or barren, as this can skew your results. Instead, aim for a mix of spots to get an overall picture.
For larger gardens, consider dividing your area into sections and randomly selecting spots within these sections. This approach helps in identifying the specific needs of different areas. This is especially important if your garden has varying sun exposure, slope, or plant types.
Tools and Materials Needed for Garden Soil Test
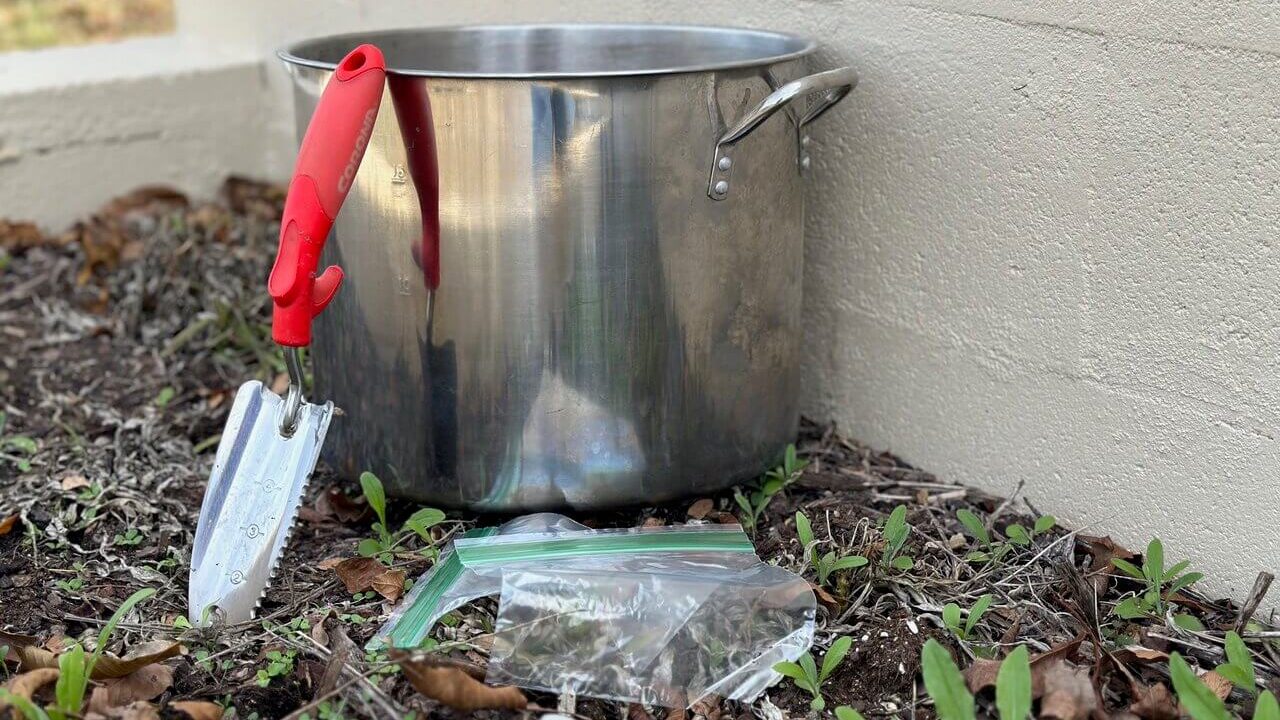
Always begin with clean tools to avoid contamination. Using a shovel, dig up samples to a depth of 6 inches. You need to get a representation of soil at the level where most roots will grow. Do this from 8-10 random areas in a large bed or lawn to 3-5 areas in a small space.
Be mindful and avoid digging samples in vastly different areas. Locations under eaves, near brush piles, and compost piles, or near gravel roads will give misleading results.
Mix each set of samples in a clean bucket. Pour enough soil into the bag as directed by the garden soil test lab. This composite sample is what you’ll send to the lab for testing. It represents an average of the different areas sampled.
If you don’t have a specific soil sample bag, use a zipper plastic bag. Be sure to double bag the sample, and label both bags in case one wears off.
Ensure the soil samples are dry prior to placing them in the collection bags. If not, place the soil on clean, white paper in your home or garage. Turn morning and evening until dry.
The Soil Sampling Process
Choosing a laboratory is your next step. State cooperative extension offices should be able to provide recommendations for garden soil tests.
If you choose to use a commercial laboratory, use an agronomic, not an environmental, soil testing lab. Most environmental laboratories are unfamiliar with agronomic soil testing and do not make nutrient recommendations.
It’s important to understand the testing options, which is not always easy. Most labs offer multiple tests ranging from basic nutrient analysis to more comprehensive screenings that include micronutrients and heavy metals.
Select the tests that align with your gardening goals and concerns. Ask your extension office for guidance on what tests are most relevant for your type of garden and region. If in doubt, a basic test that includes soil pH, phosphorus, potassium, calcium, and magnesium is a good start.
Follow the directions to prepare your samples for shipment. Ensure each sample is clearly labeled and sealed in a clean container or a zip-lock bag. Most labs provide specific containers and forms for this purpose.
Fill out any forms provided by the lab. Detail your garden’s specific concerns or what you are looking to learn from the test.
Interpreting Soil Test Results
Receiving and interpreting the soil test results is the most important part. Reports typically give detailed information on nutrient levels, pH, and other key metrics. Understanding these results is critical to making informed decisions about fertilizing and amending your soil.
For instance, a low pH reading might lead you to add lime to raise the pH. A deficiency in a particular nutrient will guide you in choosing the right fertilizer. Adjust your gardening practices based on these results to ensure optimal plant growth and soil health.
My results also indicated an extremely high level of phosphorus. A note on the report informed me how much nitrogen and potassium to add. It also stated not to add phosphorus for a couple of years. This meant I needed to be extra careful when amending the soil.
Soil amendments are products added to the soil to change its physical or chemical makeup and may supply nutrients. Common soil amendments are gypsum, agricultural limestone, and expanded shale.
Often the most effective and economical way to amend soil and add structure is to add organic materials such as compost, manures, and other organic amendments.
This post contains some affiliate links. Please click here to read my full disclosure policy.
DIY Garden Soil Test Options
For those interested in a more hands-on approach, DIY soil testing kits are available. These kits can provide immediate, albeit less comprehensive, insights into your soil’s pH and nutrient levels.
While they lack the precision of professional lab tests, they’re a good option for quick checks. They are also good if you’re just getting started with soil testing.
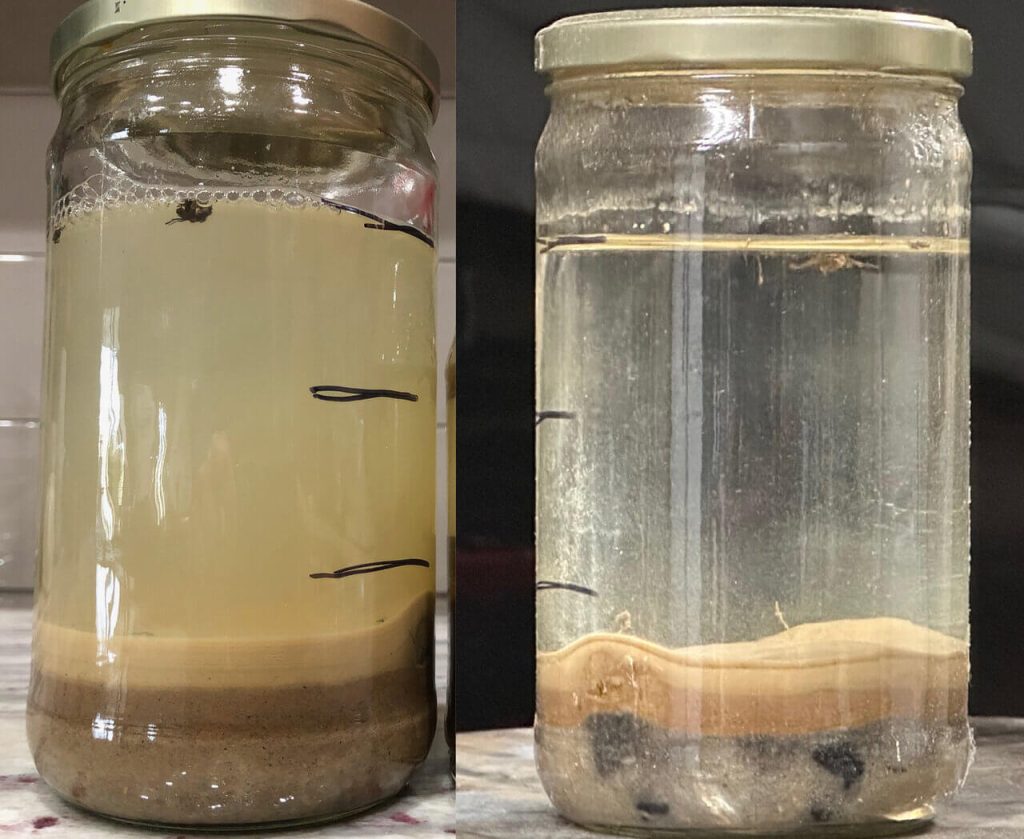
To check the proportions of organic matter and compare it to other soil types in your sample, add one cup of soil and 2 cups of water to a jar. Seal the jar and swirl to mix thoroughly. Place the jar in an out-of-the-way location. Do not move it until all the soil matter has settled and the water is clear.
Depending on the makeup of your sample, this might take a few minutes to several days. My soil is full of sandy loam. The sample took more than a week to completely settle while a friend’s sample settled within a couple of hours.
Once the sample has settled you should be able to clearly see the layers of each soil type through the glass. Heavy sand and gravel will settle to the bottom, followed by lighter silt, and topped with organic matter.
Regular Monitoring and Maintenance
Regular monitoring and maintenance of your soil are key. I recommend a garden soil test every one to two years. If you’re making significant changes to your garden’s layout or plant types you should test more frequently.
Adjust your soil sampling strategy as your garden evolves. Consider keeping a soil health journal to track changes and improvements over time.
Perform soil tests to save time wondering about deficiency issues. Provide your plants with the exact nutrients needed. Without guessing amounts of amendments or running the risk of over or under-application, your plants will thrive.
Soil testing is a simple and invaluable practice for any gardener. A small investment of time and resources can yield significant improvements in your garden’s health and productivity.
Kim Nelson gardened for more than 20 years in Colorado and more recently in Texas. She is an aspiring writer and entrepreneur.


4 Comments
Comments are closed.