Save and Store Seeds for Future Gardens
I entered a whole new realm of gardening when I learned how to save seeds. Knowing that much of my garden can be grown from last year’s plants without having to buy new seeds is nothing short of amazing. Add that fellow gardeners and I can trade seeds and I feel like I just won the gardening lottery!
Knowing how to save seeds is only part of the process. Equally important is how to preserve and store the seeds to ensure they are viable and will produce strong and healthy plants.
Seeds in History
Although saving and storing seeds may sound advanced, with a little guidance anyone can learn and join the centuries-old process. It’s fascinating that seed preservation likely predates written language, and the skill was passed down through oral history before it was recorded.
Techniques to select, save, and store seeds were developed by indigenous communities and other ancient civilizations. They considered seeds to be sacred and essential for survival. Later, many agrarian societies valued seeds and considered them a crucial part of their bartering system since they offered the promise of future crops. And still other societies around the world gave seeds as dowries, tributes, or gifts, reflecting their value though not always directly as a form of currency.
Through the ages, seeds have been saved successfully by people with no education as we know them today. They had no refrigerators or thermometers, and no way to maintain consistent temperatures. Yet they succeeded.
Why Save Seeds Today?
Most people in this world, and everyone reading this post, have access to and the ability to purchase food. Obviously, the financial standing varies, but the principle is the same.
We are not saving seeds out of necessity to survive but for other reasons of our choosing.
Seeds can be expensive to buy no matter the size of the garden and this is one of the primary motivations for gardeners to save seeds today. The cost savings from not buying new seeds each year, or not as many, can add up to a significant amount.
Preserving genetic diversity is another reason. In a world where large agribusinesses push for monocultures to streamline efficiency and offer higher yields to meet increasing market demands, heirloom varieties that offer distinct flavors and appearances and that have historical and cultural significance are at risk of being lost forever.
Plants adapt to local soil and climatic conditions over time. Saving seeds from your successful plants helps improve your garden’s performance in the coming years. Purchasing seeds from national or international companies does not offer this adaptation.
My favorite reason to save seeds is to experience full-cycle gardening. It is very satisfying to experience a plant’s full life cycle, from seed to plant and back to seed.
Choosing the Right Vegetables to Save Seeds
When planning which vegetable seeds to save, it’s imperative to know if the plant is open-pollinated or a hybrid.
Open-pollinated (OP) plants are pollinated naturally, either through wind, insects, or other natural means. Because of this natural process, if seeds are saved from OP vegetables, they will produce plants with characteristics very similar to the parent plant.
You do need to ensure they aren’t cross-pollinating with other varieties to keep the seeds pure. Heirloom varieties fall into this category.
Hybrid (F1) plants are a result of deliberate crossbreeding between two different parent plants to get desired traits from both. This crossbreeding process happens under controlled conditions and the seeds produced from this crossing are called F1 hybrid seeds.
Seeds collected from F1 hybrid plants won’t exhibit the same characteristics as their parent plants and produce uncertain traits instead. If you want to grow hybrid plants, you need to purchase seeds.
Beginner-Friendly Vegetables for Seed Saving
The best seeds to save for beginner gardeners have relatively straightforward seed-saving processes:
| Plant | Reason for Saving Seeds | Method of Seed Collection |
| Tomatoes | Easily accessible seeds. Simple fermentation process. Self-pollinating. | Let pods mature and dry on the plant. Pick, remove seeds, store. |
| Peppers | Seeds are large and easy to handle. Self-pollinating. | Cut open mature pepper, scrape out seeds, spread out, dry. |
| Beans and Peas | Self-pollinating; reduces crossbreeding. Seeds are large and easy to handle. | Let pods mature and dry on the plant. Pick, remove seeds, and store. |
| Lettuce | Self-pollinating. Straightforward seed collection. | Let pods mature and dry on the plant. Pick, remove seeds, and store. |
| Radishes | Self-pollinating. Easy-to-harvest seed pods. | Seeds are easy to extract and dry. Open pollinating, protect from cross-pollination. |
| Cucumbers (with caution) | Many commercial varieties are hybrids. Open pollinating, protect from cross-pollination. | Let cucumbers mature until large and yellow. Harvest, scoop out seeds, rinse gel off, dry. |
| Melons | Choose ripe melon, scoop out seeds, rinse, and dry. | Let plants bolt and produce seed pods. Dry pods on the plant, pick, and separate seeds. |
Basic Steps to Save Seeds
The actual process of collecting seeds varies among plant types.
Choose the Best Plants
Always begin by choosing the best seeds from your healthiest and strongest plants. These plants will have shown resistance to diseases, pests, and have thrived in your local conditions.
You can determine what “best” characteristic you want: earliest production, biggest, healthiest, tastiest, most colorful, latest producing, etc. Whatever characteristic you want, be sure to save seeds from fruit that exemplify the quality you desire. Now is not the time for “waste not, want not”. Save seeds only from the best fruits.
Harvest at the Prime Time to Save Seeds
Timing is everything when it comes to saving seeds. You need to ensure the fruit is in its prime, not over-ripe or under-ripe. Look for signs like full color, dryness, or easy separation from the plant to help determine ripeness.
Depending on the vegetable, there are different methods to process and clean seeds. For instance, tomatoes require fermentation to remove the gelatinous coating around the seeds. This is a simple process of soaking the seeds in water for 3-5 days until the slimy film is removed. The seeds are then rinsed and dried.
Beans can simply be air-dried, while lettuce seeds might benefit from a winnowing process, using the wind or a fan to separate seeds from the chaff.
Dry Seeds
Drying the seeds before storing them is essential. If seeds are stored moist, they will likely mold and be unusable. The following is a general rule of thumb for drying times of various seed sizes. Keep in mind that environmental factors, like relative humidity and temperature can influence drying times:
- Large seeds (beans, peas, corn, etc.)
- Dry time: Usually 1-2 weeks
- Test: They should be hard enough that they can’t be dented with a fingernail.
- Medium seeds (squash, cucumbers, melons, etc.)
- Dry time: 1 week or slightly longer
- Test: They should snap or break when bent.
- Small seeds (lettuce, tomatoes, peppers, etc.)
- Dry time: About a week.
- Test: They should feel hard and not bend easily.
Save and Store Seeds
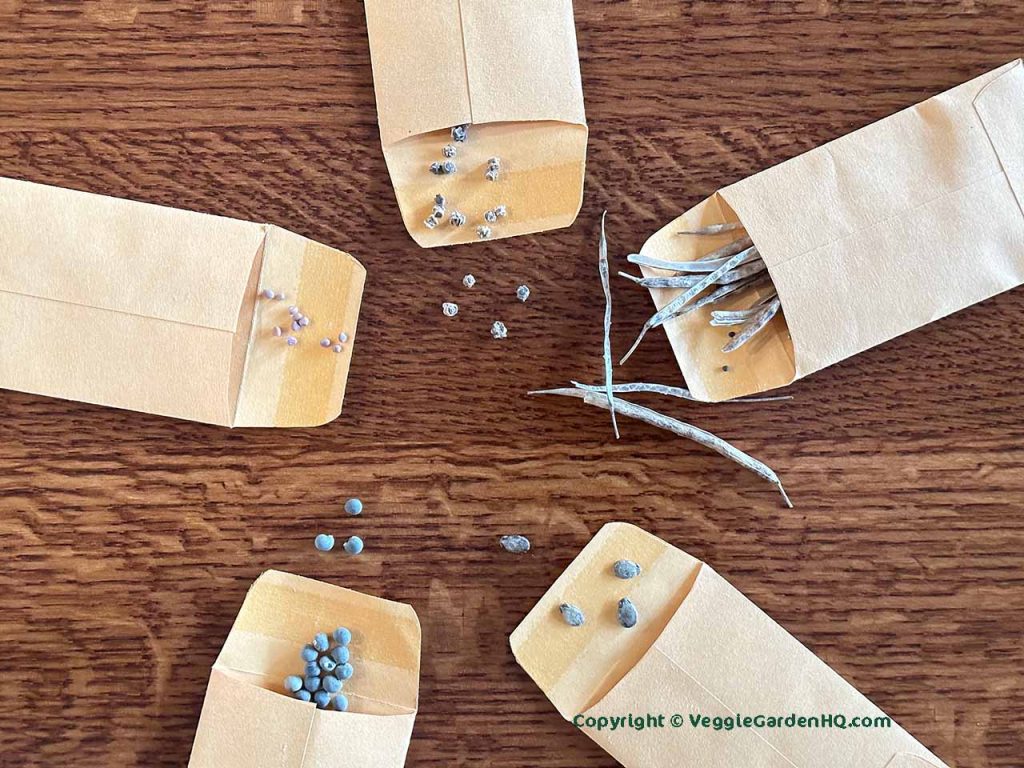
Once seeds are adequately dried, store them in a cool, dark, and dry place. You can use paper envelopes, glass jars, or plastic containers with tight-fitting lids. It’s crucial to label them with the seed type, the date of harvest, and any other pertinent information related to the characteristics of the seeds.
For added protection, you can also place silica gel packets in the storage container to absorb any remaining moisture. I store my seeds in small paper envelopes or empty plastic medicine containers that have been cleaned and organize them in a plastic bin. This makes it super easy for me to move the seeds where I need them.
Some gardeners even store their seeds in the refrigerator or freezer to extend their viability. If you choose this method, make sure the seeds are sealed tightly to prevent moisture from getting in.
Seed Viability and Germination Testing
Before planting, it’s helpful to know if the seeds you saved are viable and will germinate. There are several methods to use, but the most common are the water test and the germination test.
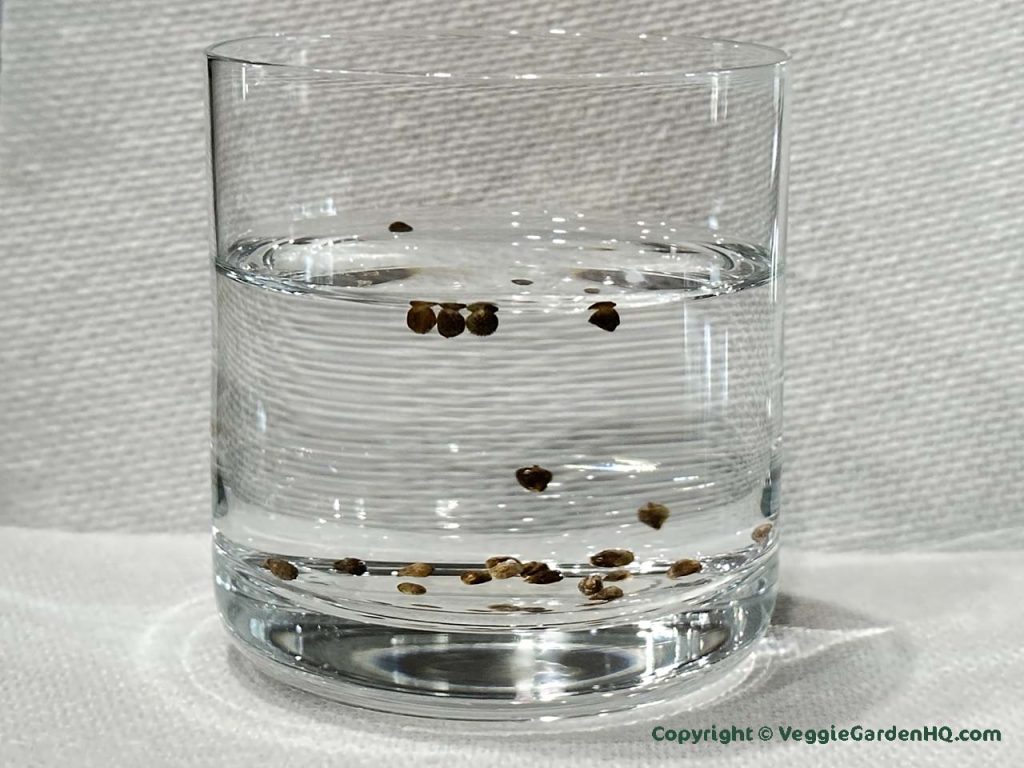
The water test is quick and gives a good idea for larger seeds but is less accurate than the germination test.
To test viability with water, fill a container with water and place the seeds into it. Wait about 15 minutes and look for seeds that remain at the bottom. These are more likely to be viable than the seeds that floated to the top. Floating seeds are either hollow or less dense because they have deteriorated and are less likely to germinate.
To test the germination rate, moisten a paper towel and wring out any excess water. Space 10 seeds on one side of the towel. Fold the other side over the seeds and then carefully place the towel in a plastic bag or container. Store this in a warm location, possibly well-lit if required by the seeds to germinate.
Check daily to make sure the towel is still damp, but not soaked. After a week or so the seeds should have germinated. Count how many sprouted to determine the germination rate. For example, if 8 out of 10 seeds sprouted, the germination rate is 80%.
The germination rate is a good indicator of seed viability. If the rate is low, you may want to consider acquiring seeds from another source to ensure a successful harvest.
Expanding Your Seed-Saving Horizon
As you become an accomplished gardener and gain confidence, challenge yourself to save seeds from open-pollinated and more difficult plants. Be sure to document your trials, both successful and not, to continually make each year a better harvest.
Consider participating in seed swaps and community events centered around gardening. Some of the libraries where I live have seed libraries where people can take seeds contributed by other gardeners for no cost. Sharing and participating in projects and events like these fosters a sense of community and shared knowledge.
The benefits of seed saving are plentiful, from economic savings to the sheer joy of watching a garden spring to life from the seeds you’ve saved. Beyond practicality, seed saving is walking hand in hand with nature and speaks to the sustainable garden practices that have been handed down from generation to generation.
Whether you are a beginning or advanced gardener, embrace the practice of seed saving by choosing one or two vegetables this season and saving their seeds. The task is easy and the reward is the unparalleled joy of seeing plants sprout and thrive from the seeds you’ve nurtured.
Kim Nelson is a Master Gardener, writer, and entrepreneur. Her love of vegetable gardening began as a young girl helping her parents and grandmother in their garden.


2 Comments
Comments are closed.